The configuration file defines options which are displayed during installation and allows to customizes the names and default values.
Configuration options for setup.ini
Just overwrite the default values within the setup.ini file. The file has different sections (indicated with [SectionName] )
This section defines the program name displayed during installation and default values.
Name of your application which is displayed during installation
|
Version number of your application which is displayed during installation.
|
Default name for directory. You can also define a sub folder, e.g. Universal Software\application1
The real path would then be ..\programs\Universal Software\application1
You can also specify a fix path like c:\Universal Software.
Alternatively you can define to install on the public document folder - see InstallOnPublicDocsFolder (recommended for documents)
|
Default name for program manager group
|
|
This section defines addition entries in the program manager group.
Adds an entry in the program manger group in a single user installation to invoke the License Viewer. This is an inbuilt Administration interface where the end user can add new licenses. It is highly recommended for network installations to add this option.
|
Adds an entry in the program manger group for each client in a Network Installation to invoke the License Viewer. This is an inbuilt Administration interface where the end user can add new licenses. It is highly recommended for network installations to add this option.
|
Adds an entry in the program manger group to invoke a ReadMe file. The ReadMe file has to be defined in the section [Files], readme.
|
|
This section defines the files which have to be copied
This defines the folder, where the All-In-One Player and the database is copied to. By default, there is no subfolder. If an application like a menu needs the All-In-One Player files in a subfolder like \docs\bin, then you can define it here.
Example: BinFolder=docs\bin
This would place the All-In-One Player, the database and the license file in a subfolder ...\docs\bin during the installation
|
The default value is, that no exe file is assigned. Then the All-In-One Player is the application, which is started when the user starts the application from the program manager group or desktop. If you have a menu application or another program, which always should be started first, then use this definition.
Example: Exe-Start-Application=menu.exe - This would always start the menu.exe
This file is automatically copied to the main installation folder.
|
Exe filename of the player (must match the name in the Publish All Media folder)
This file is automatically copied to the folder specified with BinFolder.
 Although a file name can contain spaces, you should avoid it. If file names with a space is used do not use " " Although a file name can contain spaces, you should avoid it. If file names with a space is used do not use " "
Example: exe-Filename=flash demo.exe - wrong would be: exe-Filename="flash demo.exe"
|
Filename - must match a protected file name in the Publish All Media folder. See file names and extensions. Does the project included multiple protected files, you have to add the configuration option: additional1=*
This file is automatically copied to the folder specified with BinFolder.
|
Filename of the license file (must match the name in the Publish All Media folder).
Note If this file already exists, the option OverwriteLicenseFile defines, if the license file is overwritten or not.
This file is automatically copied to the folder specified with BinFolder.
|
Define a custom icon which should appear in the program manager group. If you want to use the icon of the All-In-One Player  , use the file aioplayer.ico as provided , use the file aioplayer.ico as provided
The icon is displayed in the following locations
•Program Manager Group •Desktop Icon •Quick Launch bar •Uninstaller •If a USB installation is done, the icon is used in the autorun.inf file
If you want to change the icon in the title bar of the All-In-One Player, you have to define the icon in the screen - Image. The icon which is displayed in the File Explorer cannot be changed.
This file is automatically copied to the folder specified with BinFolder.
|
This allows to display a readme file after the installation. The readme file must be in txt or doc format.
xxx is the language identifier. The following languages are supported.
readme-ces=Czech
readme-dan=Danish
readme-deu=German - sample: readme-deu=readme-deu.txt
readme-dut=Dutch
readme-enu=English - sample: readme-enu=readme-enu.doc
readme-esp=Spanish
readme-fra=French
readme-ita=Italian
reame-jap = Japanese
readme-nor=Norwegian
readme-por=Portuguese
readme-rus = Russian
Note: As you do not know, which language the user selects during installation, you should specify for each language a readme file, even if it is always the same file.
The readme file can be added to the program manager group, so that the file can be viewed after the installation is done. See section [ProgManGroup], ShowReadmeFile.
This file is automatically copied to the folder specified with BinFolder.
|
This command allows to copy additional files. You can either specify one file (e.g. doc-course1.pdf) or a complete group of files (*.pdf). A maximum of 20 different files or folders can be copied. These files are copied to the main installation folder. They are not protected.
If you want to copy a complete folder, then specify the folder name and \*, e.g. image\* would copy the complete folder image. By default, the folder content is copied to the main directory. If you want to copy the files to a different folder, then you can specify the folder name with addtionalfolderx, where x is the same number like in additionalx.
Example: additional4=image\* and additionalfolder4=image4 - all files from the folder \image would be copied to the hard disk to the folder \image4.
If all files including sub folders should be copied, use *
Example: "additional1=*". Copies all files and sub folders
If a file already exists on the target machine, the file is replaced.
additional1=*.bat
additional2=doc-course1.pdf
additional3=course*-lesson*.avi
additional4=image\*
additional5=
additional6=
.....
additional20=
additionalfolder1=
additionalfolder2=
additionalfolder3=
additionalfolder4=image4
additionalfolder5=
additionalfolder6=
......
additionalfolder20=
|
|
Sie können eine Installation auf bestimmten Windows Betriebssystemen ausschließen, wenn der Wert = true gesetzt wird. Der Standardwert ist false.
DoNotInstallOnWindows2000=true 'verhindert eine Installation auf Windows 2000
DoNotInstallOnWindowsXP=
DoNotInstallOnWindowsXPx64=
DoNotInstallOnWindowsVista=
DoNotInstallOnWindows7=
DoNotInstallOnWindows8
|
Display a license agreement text during installation. The file must be a text file. If you do not want to display a license agreement, leave all fields empty.
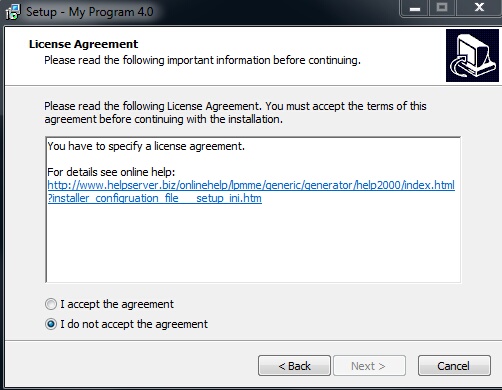
xxx is the language identifier. The following languages are supported.
license-default=license.txt ' this text is used if a language does not have a license text defined
license-ces=Czech
license-dan=Danish
license-deu=German 'sample: license-deu=license-german.txt
license-dut=Dutch
license-enu=English 'sample: license-enu=license-english.txt
license-esp=Spanish
license-fra=French
license-ita=Italian
license-jap=Japanese
license-nor=Norwegian
license-por=Portuguese
license-rus=Russian
|
|
If this option is set to false (default), the product is installed in c:\Program Files (x86). However, this requires administrator permissions during installation.
If you distribute files like PDF or videos, the documents folder is more suitable. It does not require administrator permission. The public documents folder is used.
C:\Users\Public\Documents\My Application
|
This option allows to either install the version from CD/Download to a USB flash drive or to the hard disk. It copies all files to the USB flash drive and adds the link to the USB flash drive in the program manager group. It automatically adds a program add-startup-icon.exe on the USB flash drive. If the user takes the USB flash drive to another PC, this EXE file would generate also a program manager group entry and allow to simply start the file from the program manager group or desktop icon.
A autorun.inf file is copied to the main directory of the USB flash drive. This would start the All-In-One Player if the USB flash drive is attached to the PC.
If you specified an Icon in the [Files] section, then the icon is displayed in the file explorer as the USB flash drive icon.

For online activation, the activation server has to use installation code 11 as the main criteria. If the USB flash drive does not support copy protection, then the license is automatically bound to the PC which makes the activation.
Specify Code 11 as the Primary Hardware ID and code 4 as the Alternative Hardware ID.
|
If you send out an update of your product you can define, if the existing licensing information is kept (license file .lic is not changed) or if the customer has to activate the product again.
true = existing license is overwritten. New activation necessary
false = existing license information is not changed. No activation necessary
The default option is false
|
The Installation Manager can start an EXE file either before or after the installation is done. You can also define, if the EXE file is only started during the single user installation or also during the network installation. The installation manager waits, until the program is terminated.
Starts the All-In-One Player after the installation. The default setting is true
|
Starts the All-In-One Player after the network client installation (setup-client.exe). The default setting is true
|
Name of an EXE file, which is started before the installation of the All-In-One Player. If no path is provided, it is started from the installation folder.
Example: RunBeforeInstall=runfirst.exe
If the EXE file is located in a subfolder, specify the subfolder as a relative path to the installation folder
Example: RunBeforeInstall=\files\runfirst.exe
The EXE file is only started during a single user installation.
|
Name of an EXE file, which is started after the installation of the All-In-One Player. If no path is provided, it is started from the \bin folder.
Example: AfterInstall=runfirst.exe
If the EXE file is located in a subfolder, specify the subfolder as a relative path to the bin folder
Example: RunBeforeInstall=\files\runfirst.exe
The EXE file is only started during a single user installation.
You have to copy the EXE file to the installation folder using the additionalx command in the [Files] section.
|
Name of an EXE file, which is started before the network installation of the All-In-One Player. If no path is provided, it is started from the installation folder of the client setup application (setup-client.exe).
Example: RunBeforeInstall=runfirst.exe
If the EXE file is located in a subfolder, specify the subfolder as a relative path to the installation folder
Example: RunBeforeInstall=\files\runfirst.exe
The EXE file is only started during the Client network installation.
|
Name of an EXE file, which is started after the network installation of the All-In-One Player (setup-client.exe). If no path is provided, it is started from the \bin folder.
Example: AfterInstall=runfirst.exe
If the EXE file is located in a subfolder, specify the subfolder as a relative path to the bin folder
Example: RunBeforeInstall=\files\runfirst.exe
The EXE file is only started during a Client network installation.
You have to copy the EXE file to the installation folder using the additionalx command in the [Files] section.
|
|
This section provides uninstall information using the Windows standard uninstall options (control panel, add/remove programs).
URL for support page. If not available use main homepage URL
|
URL for Update page. If not available use main homepage URL
|
|
Have a close look at the options, which files should be launched after the installation or which file should be the main start application.
•[Options], RunPlayerAfterInstall=true starts the All-In-One Player after the installation
•[Options],RunAfterInstall=menu.exe starts a menu application after the installation
•[Files],Exe-Start-Application=menu.exe defines a menu application as the start program (selected either in the program manager group or from the desktop