|
|


Step 2 - Install the Activation Server |

|

|

|

|
||
Step 2 - Install the Activation Server |
|
|
|

|

|
|
|
Step 2 - Install the Activation Server |
|
|
|
|
||
Step 2 - Install the Activation Server |
|
|
|
|
|
|
|
||
The installation package checks if all necessary system requirements like IIS, ASP.NET are available, creates the database and configures the Activation Server.
If you install on a server with an existing version of the Activation Server, see Install Updates
Now you are ready to install Activation Server 3.1.3. To start the installation, execute activation-server4.exe
The installer will first check if you have the correct version of IIS and .NET installed.
If this initial check is OK, it checks the prerequisites. If missing, they are automatically downloaded.
 |
| Prerequisites - Start screen |
 |
| Prerequisites - Select components |
•In case, you already have an MS SQL server installed, you don't have to check to install SQL Server 2008 Express. Otherwise you have to install this server version. There is a detail configuration and setup explanation here
•The Open XML SDK is always installed at the end of the installation. In case an older version is found, it is automatically uninstalled
The download of all prerequisites is automated so you don't have to use the manual download links.
After all prerequisites are installed, the main installer launches.
A default folder is suggested. Before you can continue, you have to check that you agree to the license terms and conditions.
 |
| Select directory |
Select if it is a new installation of Activation Server or if you want to upgrade an existing installation.
 |
| Select type of installation |
Type in the SQL Servername\instance. If you use SQL Server Express Edition, the default server name is .\SQLEXPRESS. To create the database for the Activation Server server, the installer needs the login data and administrator rights to create a database. Specify an existing SQL server user with admin rights - the default user is: sa. These credentials are used only to create the database and add users. Type in the password you used during the SQL Server installation.
 |
| SQL Server login |
If you get the following error message after clicking on Next,
 |
| SQL Server login failed |
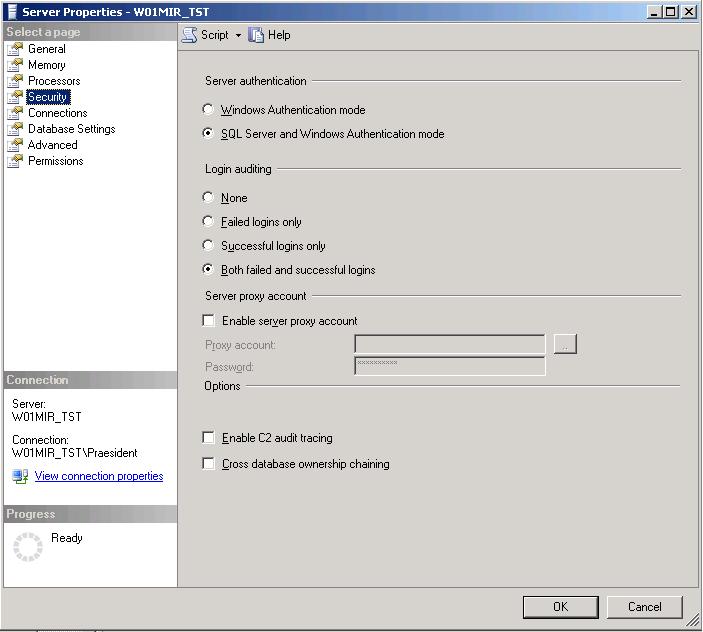
then either the user name / password is wrong or the server is configured only for integrated windows authentication. Change the mode to SQL Server and Windows Authentication mode and/or update the user right. Otherwise you cannot continue.
During installation, SQL Server Database Engine is set to either Windows Authentication mode or SQL Server and Windows Authentication mode.
To change security authentication mode
1.In SQL Server Management Studio Object Explorer, right-click the server, and then click Properties. 2.On the Security page, under Server authentication, select the new server authentication mode, and then click OK. 3.In the SQL Server Management Studio dialog box, click OK to acknowledge the requirement to restart SQL Server.
|
If you get the following error message while the product is installed
 |
| Error - Create database permission denied |
then you do not have Windows user rights to create a database on the default folder used for a SQL database.
The installer will create a database Activation Server and stores the login details in the file web.config
If you get the error message: There is a problem with the IIS user
 |
| Wrong IIS user |
then you have to add the necessary rights for the ASP service after the installation is done.
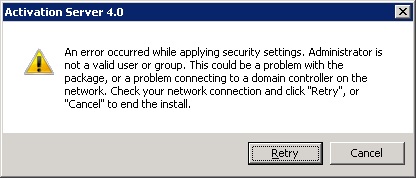
A user with the name Administrator is required. You probably renamed it. Rename the admin user back to Administrator
|
Select the shortcuts which should be created.
 |
| Create shorcut links |
You provided now all necessary information to start the installation. You could review your settings using the Back button.
The installation files are copied to selected folder. The database is created and the IIS is configured. At the end of the installation the open XML SDK installer launches. Just confirm all steps.
The next step is to start the Web Administration Interface. Click on Run
 |
| Installatioin finished |
You will get an additional screen with explanation how to login
 |
| First login |
After clicking on Goto Login Page it could take a while, until the Login Screen appears. At the first launch of the server, sql scripts are launched to generate tables and add default values.
Now install updates / service packs