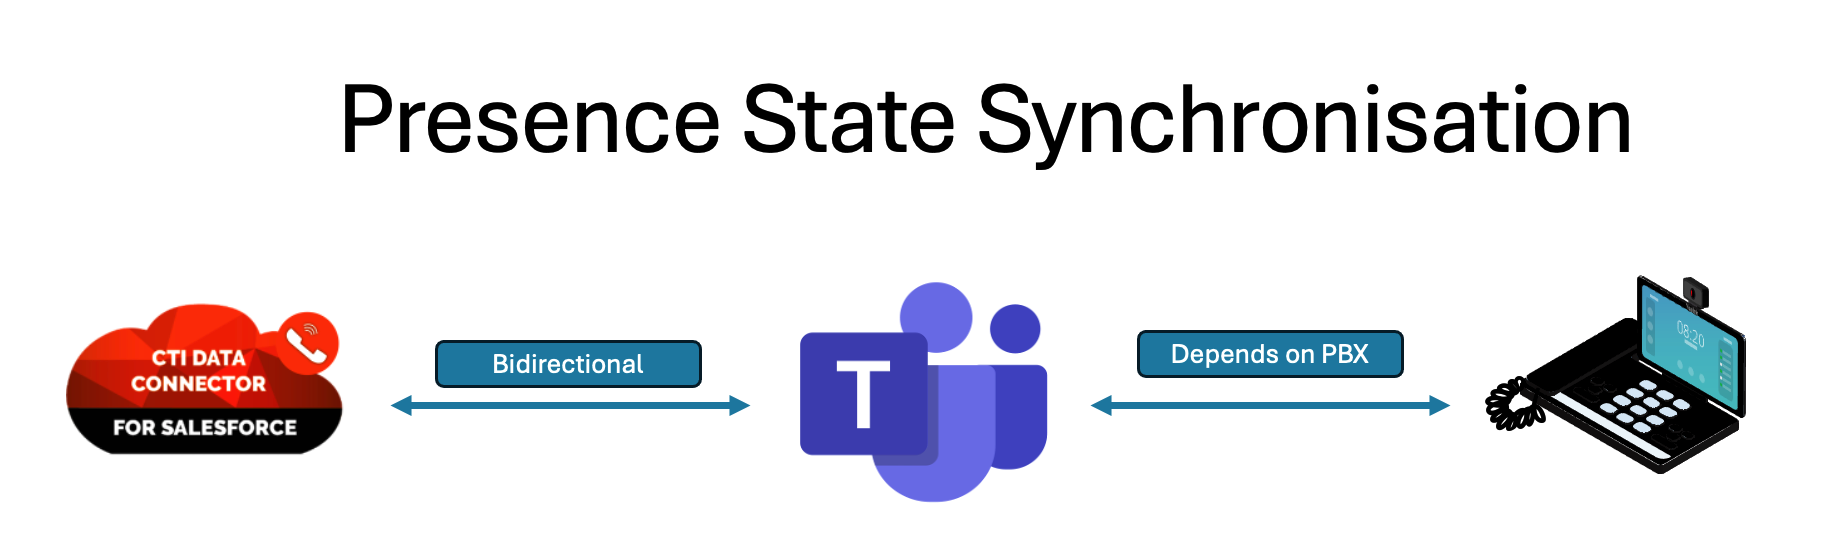
Presence State Synchronization
Many users have an on-premise or cloud telephone system and use MS Teams for internal calls or web meetings. Unaric Voice now brings both worlds together.
The Presence status is synchronized between Salesforce and MS Teams. There are multiple advantages:
•Prevent an incoming MS Teams call during a phone call
•Show the MS-Teams presence state in the Live Agent Dashboard for all users
If the telephone system also offers MS Teams presence status synchronization (e.g. Swyx, 3CX, Webex Calling), the presence status can be changed from Salesforce to MS Teams to the telephone system and is thus always identical.
Standard Phone Systems - Presence state synchronizing via MS-Teams
Applies to the following Connectors:
•TAPI
•GoConnect Server
•Go Integrator and Webex Calling
•Mirage MIA Phone
•3CX
Unaric Voice supports a bidirectional presence state synchronization between Salesforce and MS-Teams.
To set it up, follow the instructions under configuration below.
1. Assigning the Presence State configuration record to your Call Center Setup
A special presence state configuration record is already delivered with the package, you only need to assign it to your Call Center Setup.
Edit your Call Center Setup and select the Phone System with MS-Teams - Presence State record by clicking on the icon and finally click on Save. icon and finally click on Save.

2. Selecting MS-Teams as Meeting Application
After you've saved, from your Call Center Setup, click on the Phone System with MS-Teams - Presence record that you just added, and edit it.
Scroll down to the Syncronize with Meeting Application section and select MS-Teams as your Meeting Application, and bidirectional for synchronization direction.

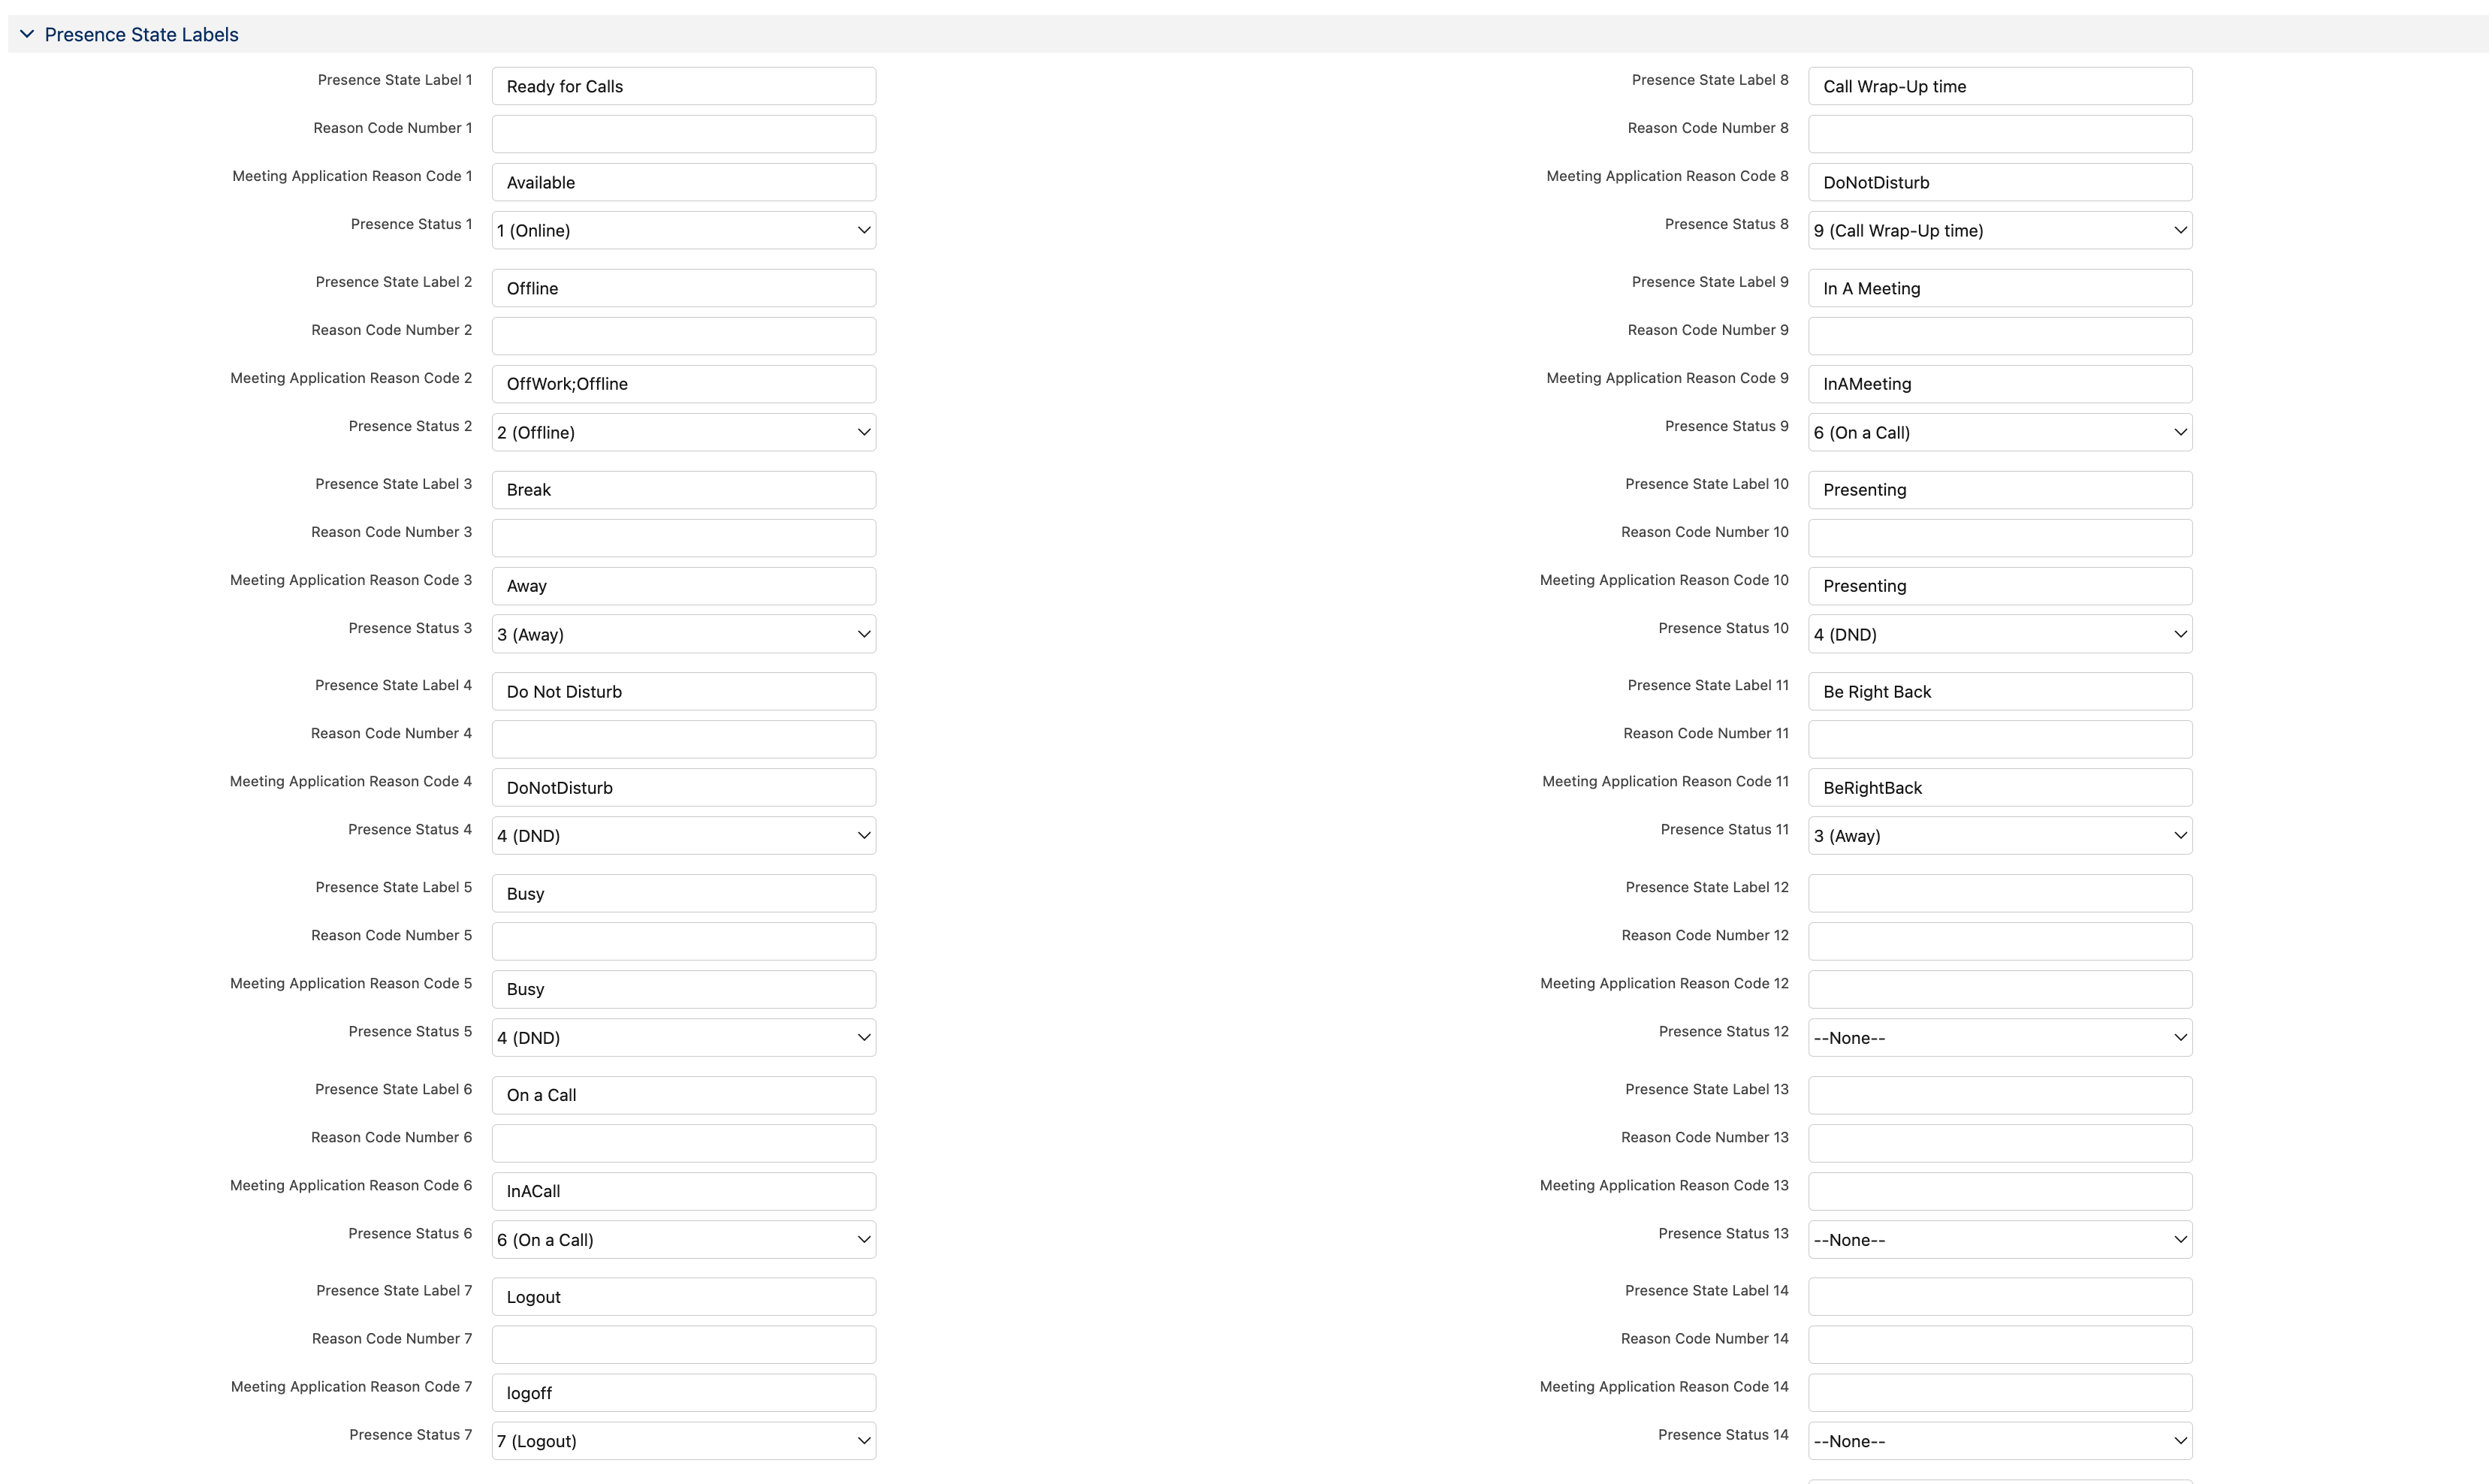
 Presence State Labels Presence State Labels
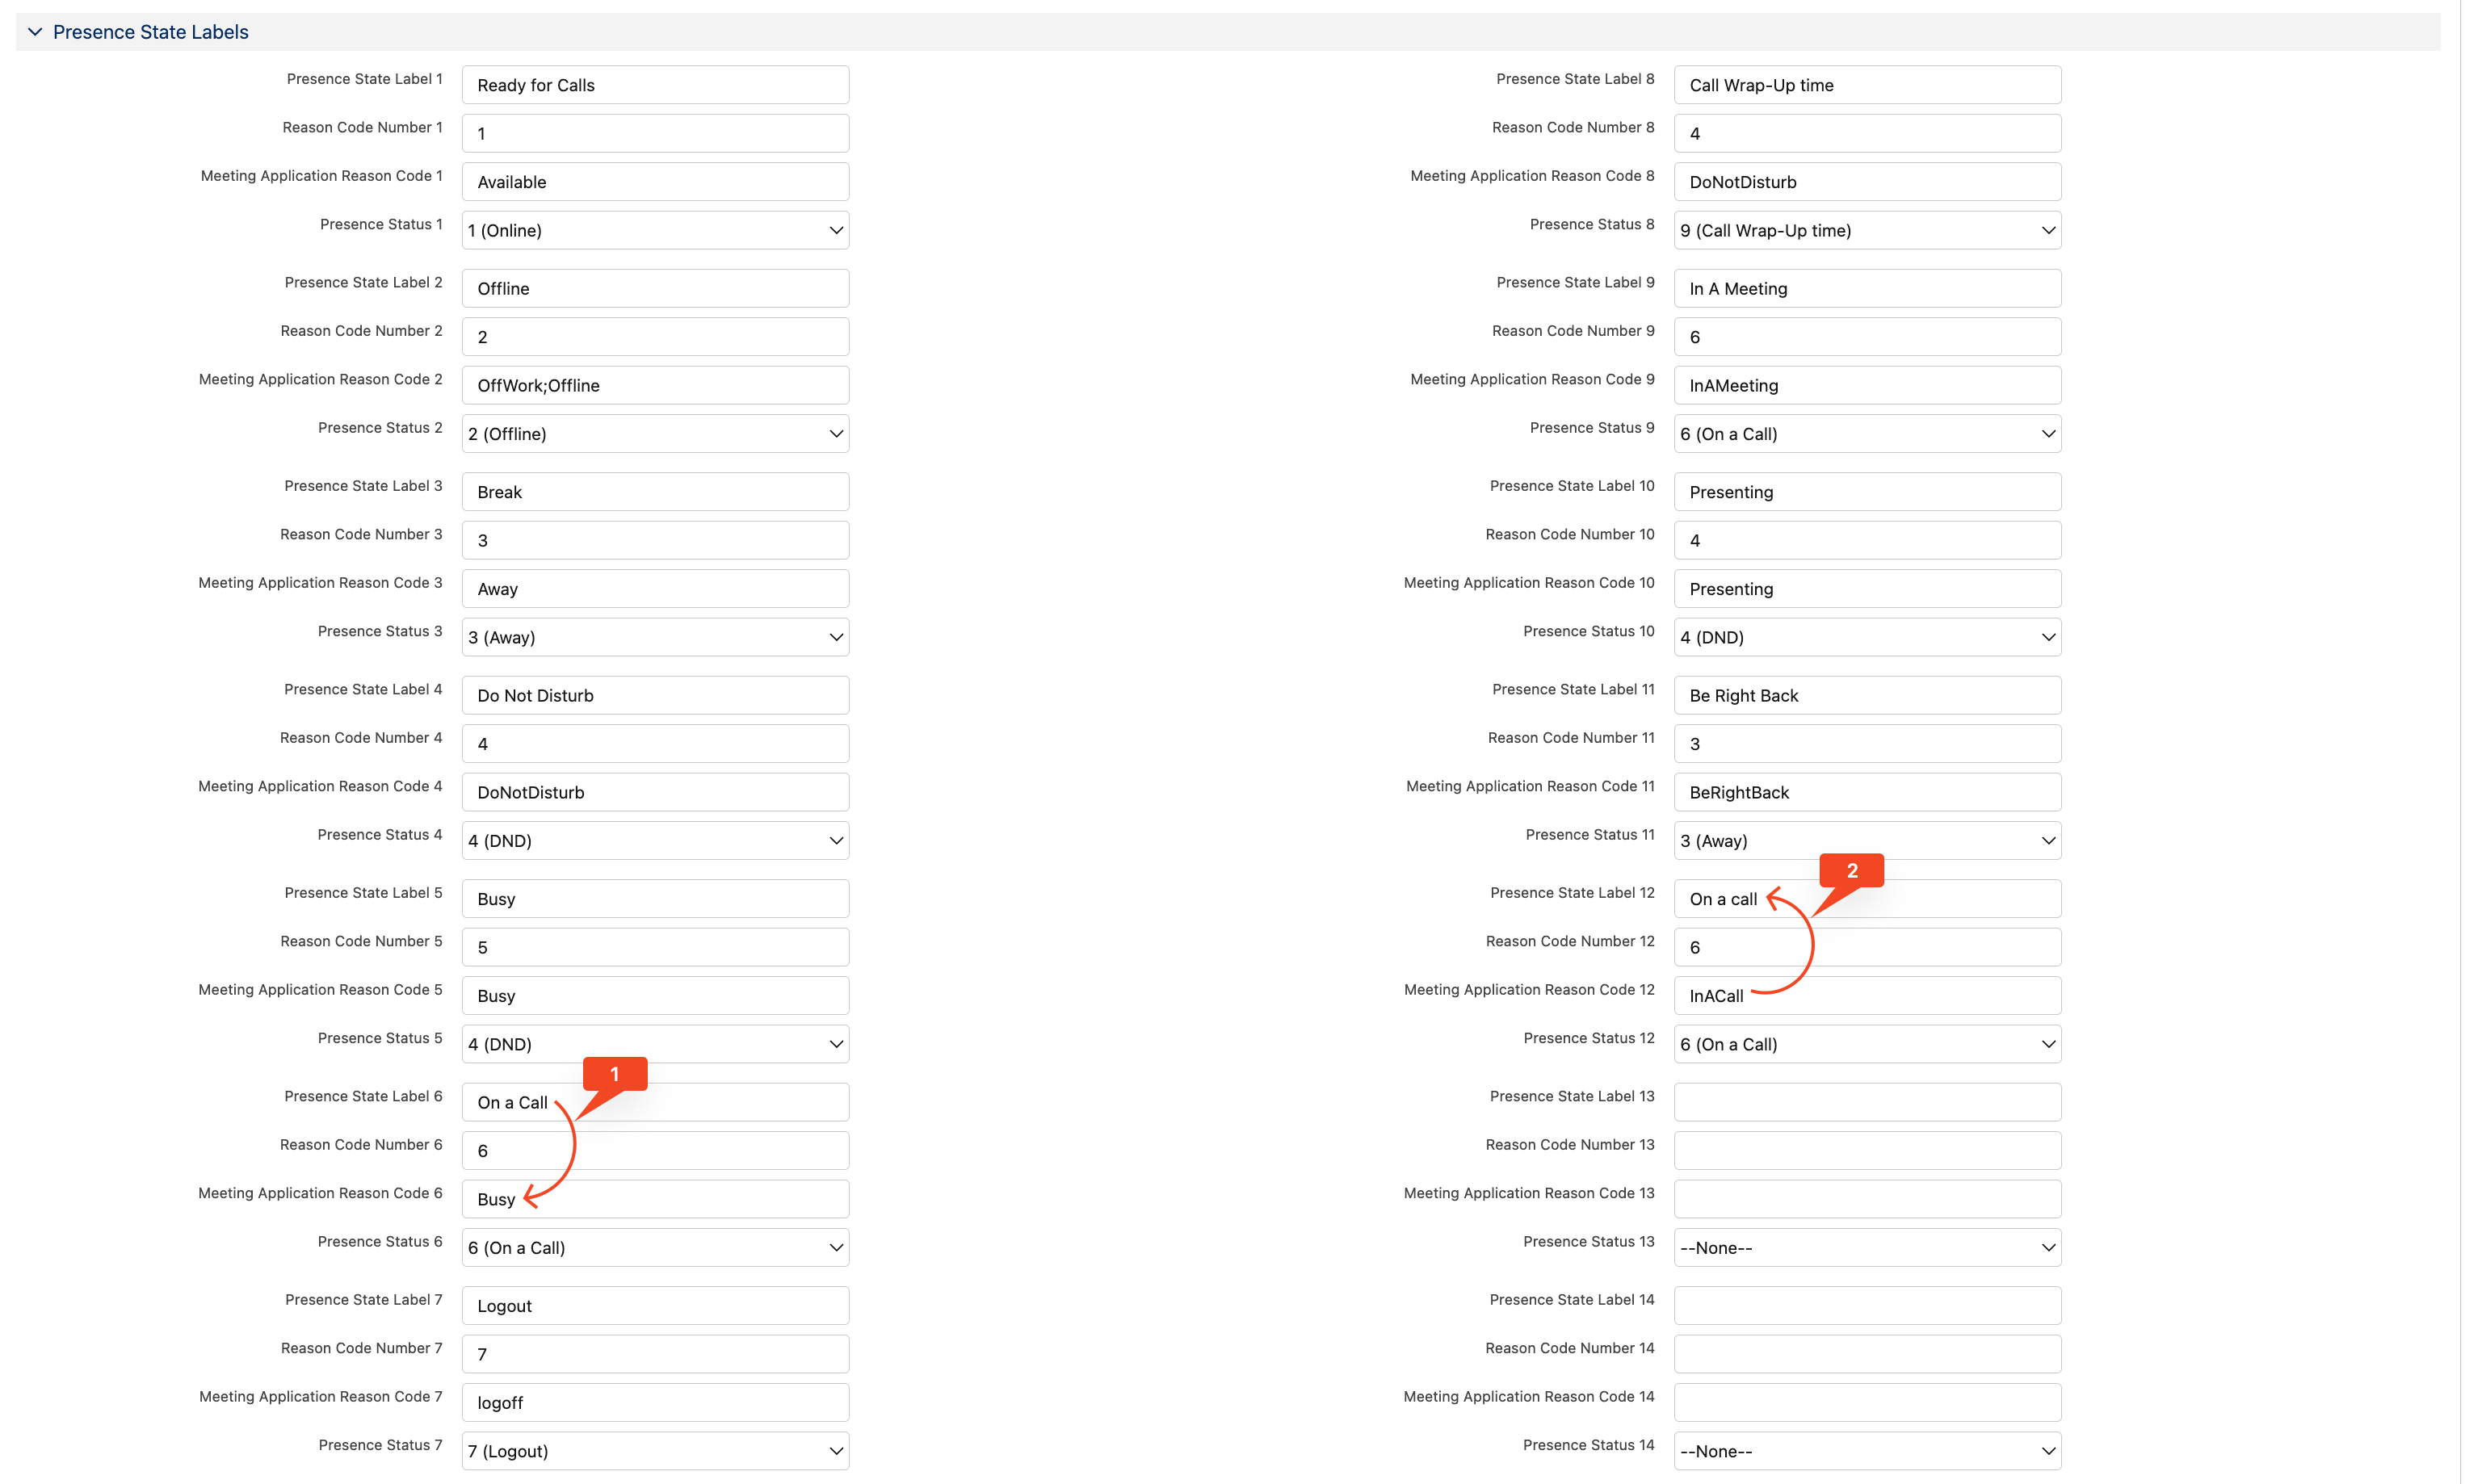
The below marked presence state labels show the presence states mapping between Salesforce and MS-Teams.
1. On a Call in Salesforce will set the presence state Busy in MS-Teams (as MS-Teams internal states like InACall cannot be set from Salesforce).
In MS-Teams, the user can receive calls while on Busy presence state, to avoid that, ask your MS-Teams administrator to configure Busy on busy.
2.In a Call state in MS-Teams will set the presence state On a Call in Salesforce.
More details about Presence State
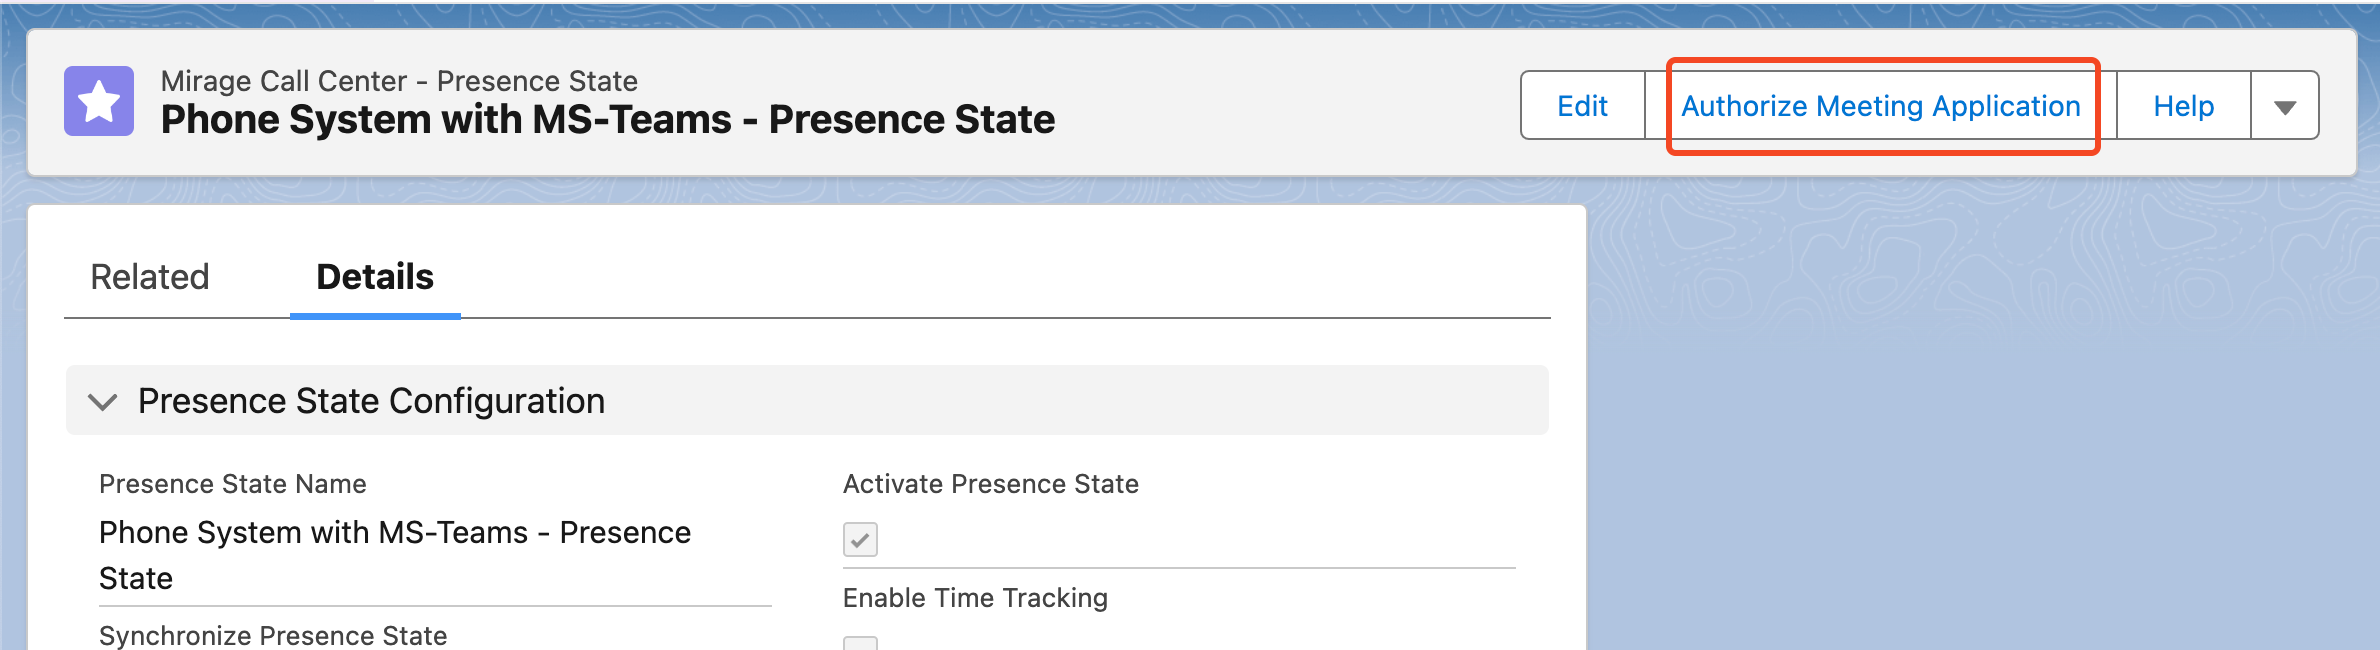
3. Authorizing the Meeting Application
After you've saved, scroll to the top and click on Authorize Meeting Application
A new page will appear, on which you need to enter the details of your Azure App which is used for the presence synchronization.
A guide how to configure the Azure App can be found here.
You also need to add the Redirect URI to your Azure App redirect URI-s.
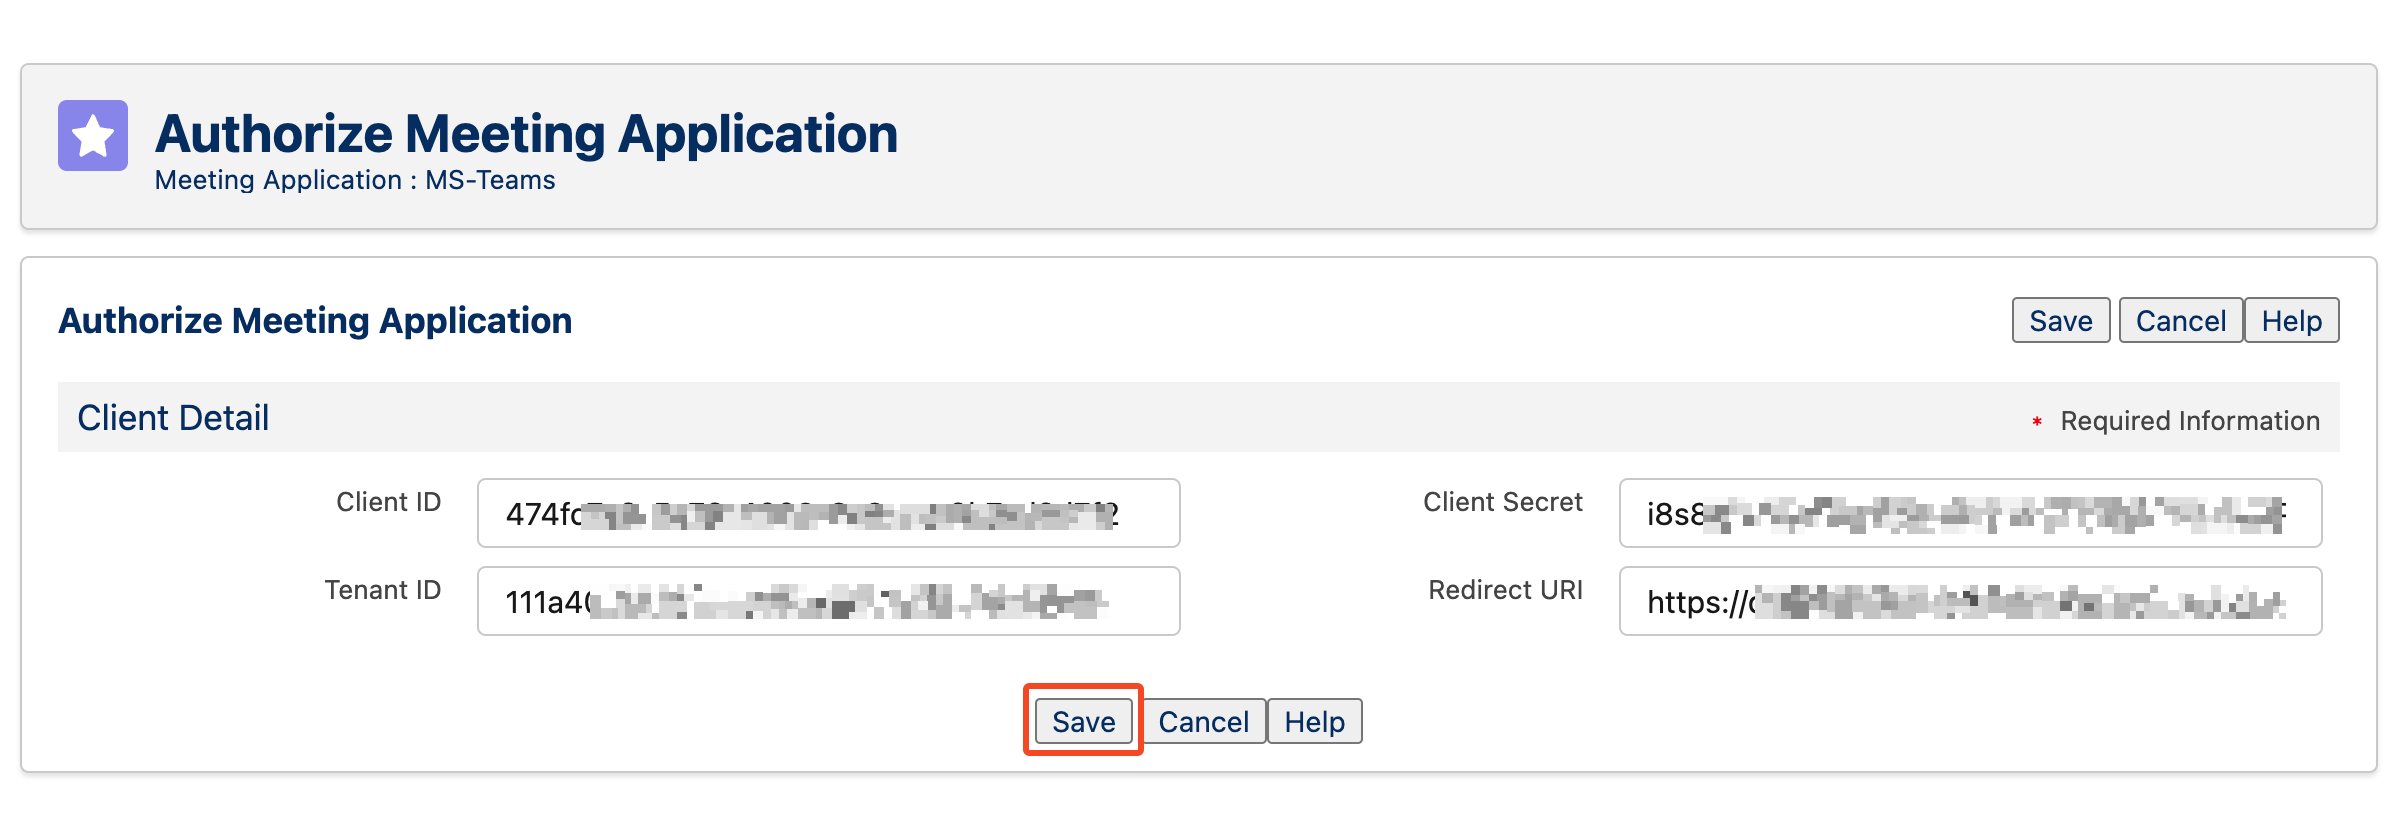
Enter the App details and click on Save.
After the authorization, you need to logout and re-login to Salesforce.
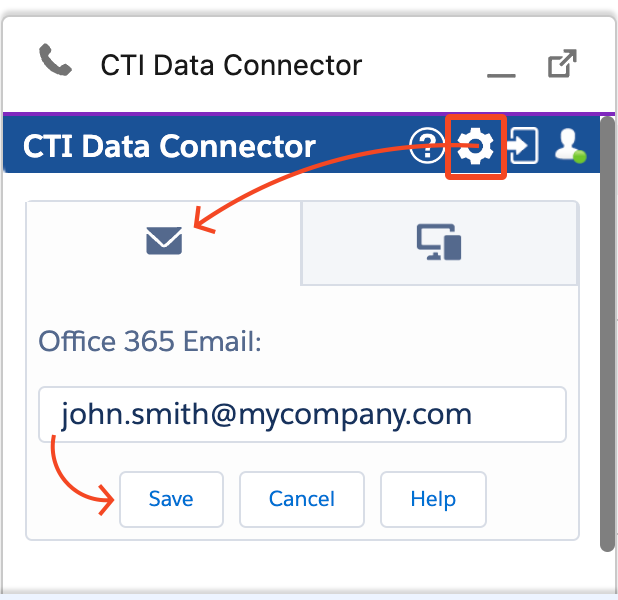
Enter your Office 365 Email
You need to enter your Office 365 email address which determines the MS-Teams account you want to synchronize presence status with.
Click on the CTI Data Connector in the utility bar, then click on the gear icon, and click on the email tab, enter your email address and click Save.
|
Presence State synchronization for Webex Calling via Microsoft Teams

Since a direct presence state synchronization between Webex and Salesforce is not supported, we support a bidirectional presence state synchronization between Salesforce and MS-Teams.
Webex Voice supports an own integration to MS-Teams which synchronizes the presence states but with some limitations, as shown in the below table.
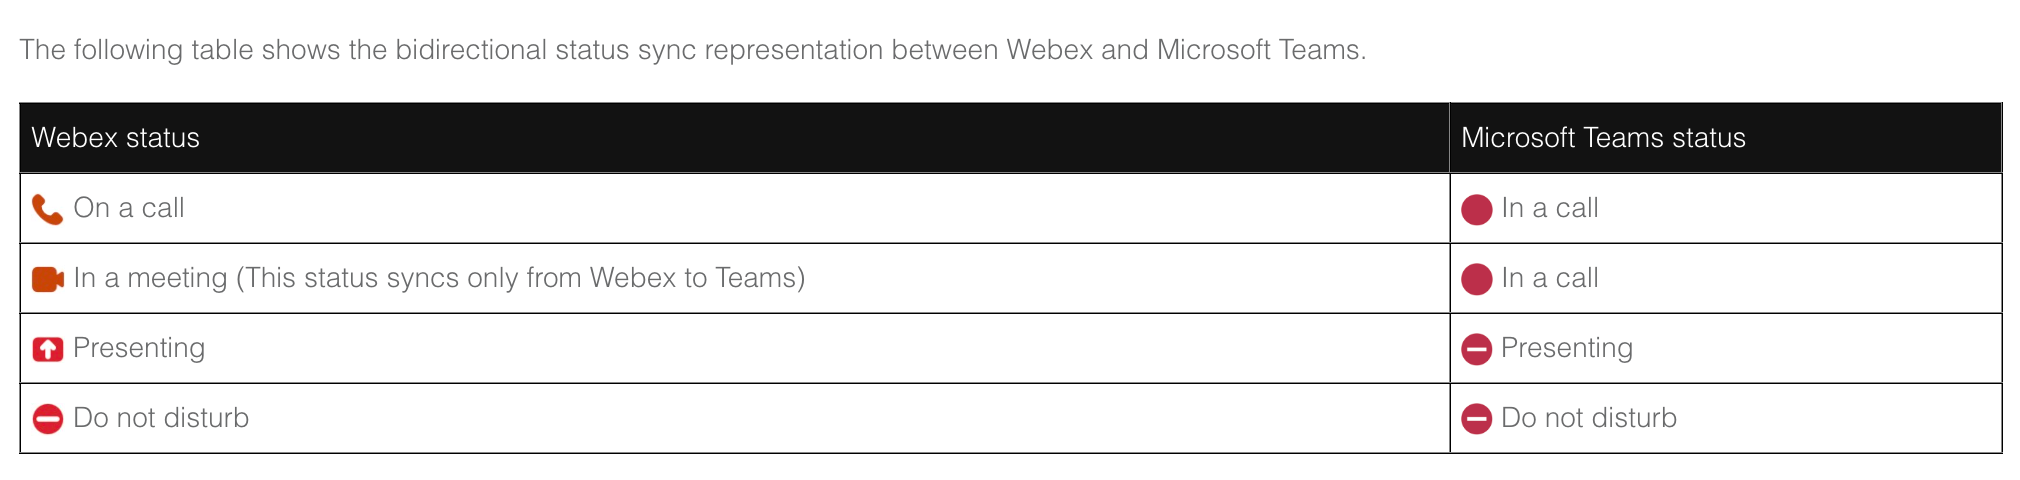
Source: https://help.webex.com/en-us/article/n0l9q2z/Configure-Microsoft-Teams-for-Webex-Calling
If you want to synchronize presence states between MS-Teams and Webex, the Microsoft Teams for Webex Calling integration is require. Please follow the instructions in the Webex documentation on how to set it up.
This configutation applies to Call Center Setups with a connection to Webex Voice phone system.
1. Assigning the Presence State configuration record to your Call Center Setup
A special presence state configuration record for Webex is already delivered with the package, you only need to assign it to your Call Center Setup.
Edit your Call Center Setup and select the Swyx / Webex Voice with MS-Teams - Presence State record by clicking on theicon and finally click on Save.

2. Selecting MS-Teams as Meeting Application
After you've saved, from your Call Center Setup, click on the Swyx / Webex Voice with MS-Teams - Presence State record that you just added, and edit it.
Scroll down to the Syncronize with Meeting Application section and select MS-Teams as your Meeting Application, and bidirectional for synchronization direction.
Presence State Labels
The presence state labels show the presence states mapping between Salesforce and MS-Teams.
Since the presence state synchronization between Salesforce and Webex Voice is not directly supported, Reason Codes are left blank.
Present state synchronization between Salesforce and Meeting App (MS-Teams) is bidirectionally supported.
More details about Presence State
3. Authorizing the Meeting Application
After you've saved, scroll to the top and click on Authorize Meeting Application

A new page will appear, on which you need to enter the details of your Azure App which is used for the presence synchronization.
A guide how to configure the Azure App can be found here.
You also need to add the Redirect URI to your Azure App redirect URI-s.
Enter the App details and click on Save.
After the authorization, you need to logout and re-login to Salesforce.
Enter your Office 365 Email
You need to enter your Office 365 email address which determines the MS-Teams account you want to synchronize presence status with.
Click on the CTI Data Connector in the utility bar, then click on the gear icon, and click on the email tab, enter your email address and click Save.
After you've saved, your presence state is now bidirectionally synchronized between Salesforce and MS-Teams.
|
Presence State synchronization for Swyx via Microsoft Teams

Since a direct presence state synchronization between Swyx and Salesforce is not supported, we support a bidirectional presence state synchronization between Salesforce and MS-Teams.
Swyx supports an own integration to MS-Teams which synchronizes the presence states in a limited one-direction only (MS-Teams to Swyx).
Swyx supports only these states - On a Call, Available, Away, DND and Offline, this means:
a). If MS-Teams is in Busy state it will set Swyx to Away
b). If Teams is in Presenting / Be Right Back / InAMeeting → no affect on Swyx
If you want to synchronize presence states between MS-Teams and Swyx, the Swyx Connector for Microsoft Teams is required. Please follow the instructions in the Swyx documentation page on how to set it up.
This configutation applies to Call Center Setups with a connection to Swyx phone system.
1. Assigning the Presence State configuration record to your Call Center Setup
A special presence state configuration record for Swyx is already delivered with the package, you only need to assign it to your Call Center Setup.
Edit your Call Center Setup and select the Swyx / Webex Voice with MS-Teams - Presence State record by clicking on theicon and finally click on Save.
2. Selecting MS-Teams as Meeting Application
After you've saved, from your Call Center Setup, click on the Swyx / Webex Voice with MS-Teams - Presence State record that you just added, and edit it.
Scroll down to the Syncronize with Meeting Application section and select MS-Teams as your Meeting Application, and bidirectional for synchronization direction.
Presence State Labels
The presence state labels show the presence states mapping between Salesforce and MS-Teams.
Since the presence state synchronization between Salesforce and Swyx is not directly supported, Reason Codes are left blank.
Present state synchronization between Salesforce and Meeting App (MS-Teams) is bidirectionally supported.
More details about Presence State
3. Authorizing the Meeting Application
After you've saved, scroll to the top and click on Authorize Meeting Application
A new page will appear, on which you need to enter the details of your Azure App which is used for the presence synchronization.
A guide how to configure the Azure App can be found here.
You also need to add the Redirect URI to your Azure App redirect URI-s.
Enter the App details and click on Save.
After the authorization, you need to logout and re-login to Salesforce.
Enter your Office 365 Email
You need to enter your Office 365 email address which determines the MS-Teams account you want to synchronize presence status with.
Click on the CTI Data Connector in the utility bar, then click on the gear icon, and click on the email tab, enter your email address and click Save.
|
Presence State synchronization for 3CX via Microsoft Teams
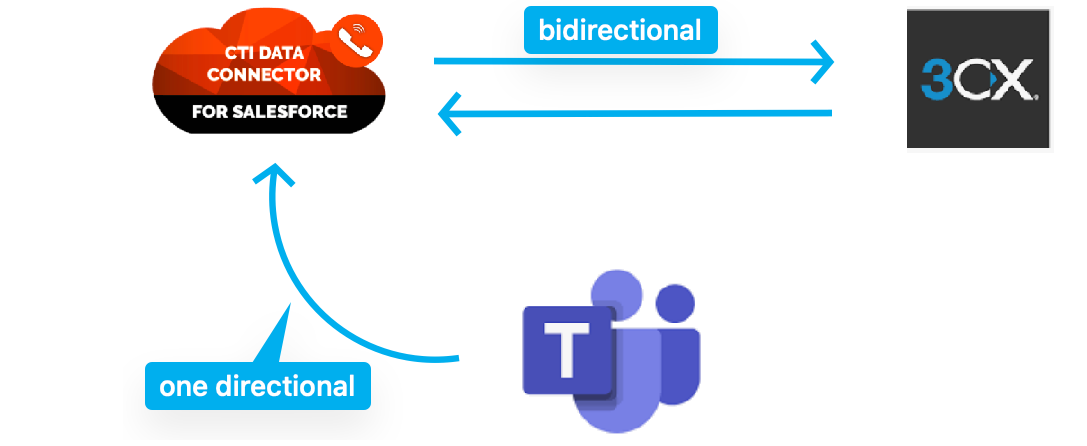
Bidirectional presence state synchronization between Salesforce and 3CX is supported.
One-direction presence state synchronization from MS-Teams to 3cx is supported.
Changing presence state in Salesforce → will sync to 3CX only.
Changing presence state in 3CX → will sync to Salesforce only.
Changing presence state in MS-Teams → will sync to Salesforce → which will sync to 3CX.
This configutation applies to 3CX Call Center Setups with a connection to 3CX phone system.
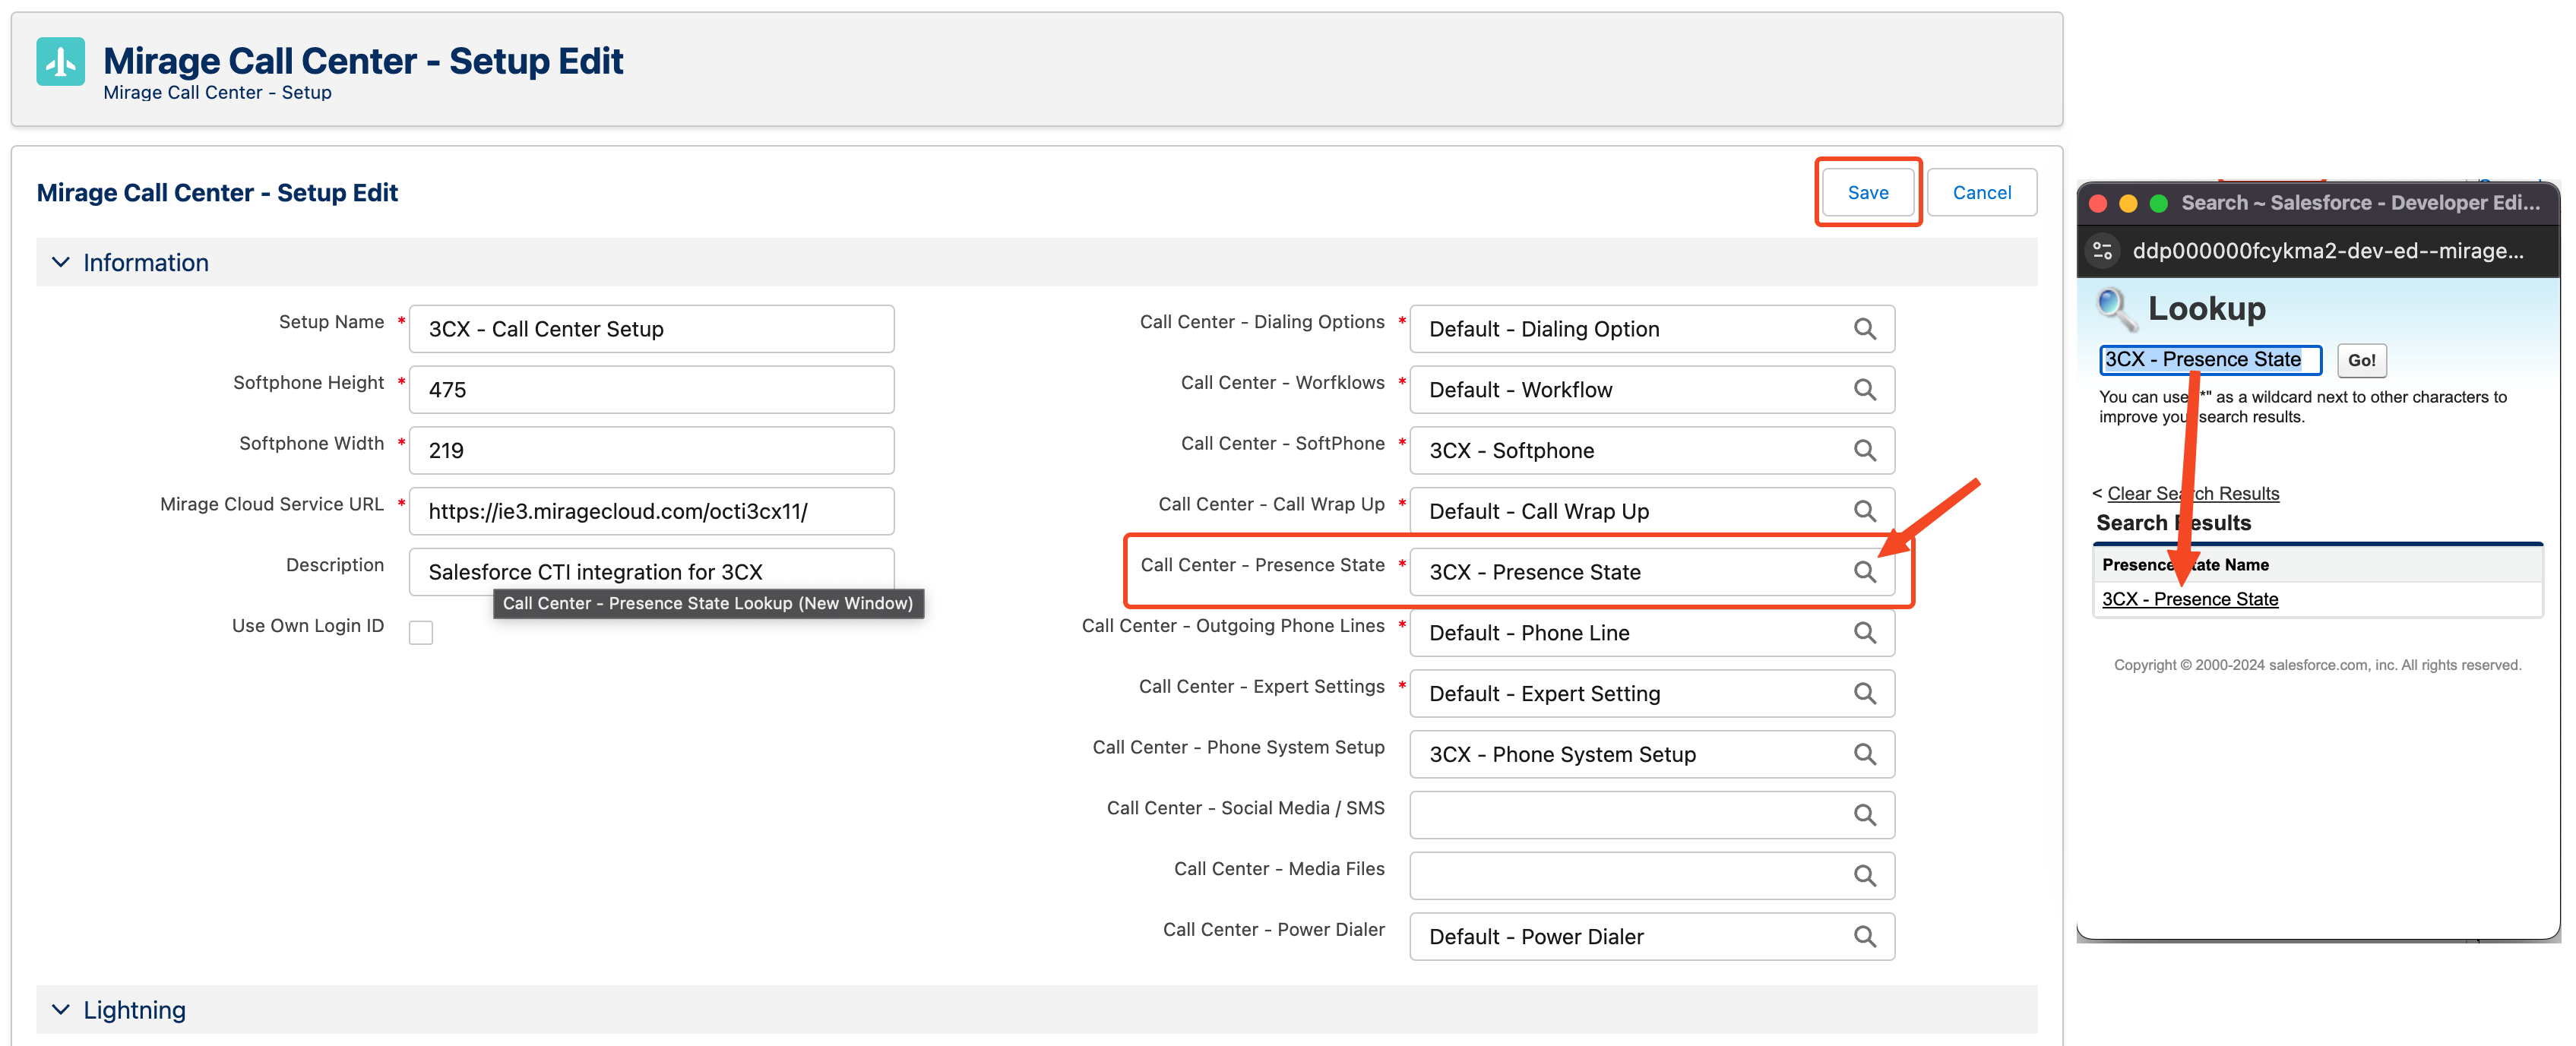
1. Assigning the Presence State configuration record to your Call Center Setup
A special presence state configuration record for 3CX is already delivered with the package, you only need to assign it to your 3CX Call Center Setup, if it's not already assigned.
Edit your Call Center Setup and select the 3CX - Presence State record by clicking on theicon and finally clicking on Save.
2. Selecting MS-Teams as Meeting Application
After you've saved, from your Call Center Setup, click on the 3CX - Presence State record that you just added, and edit it.
Scroll down to the Syncronize with Meeting Application section and select MS-Teams as your Meeting Application, and bidirectional for synchronization direction.

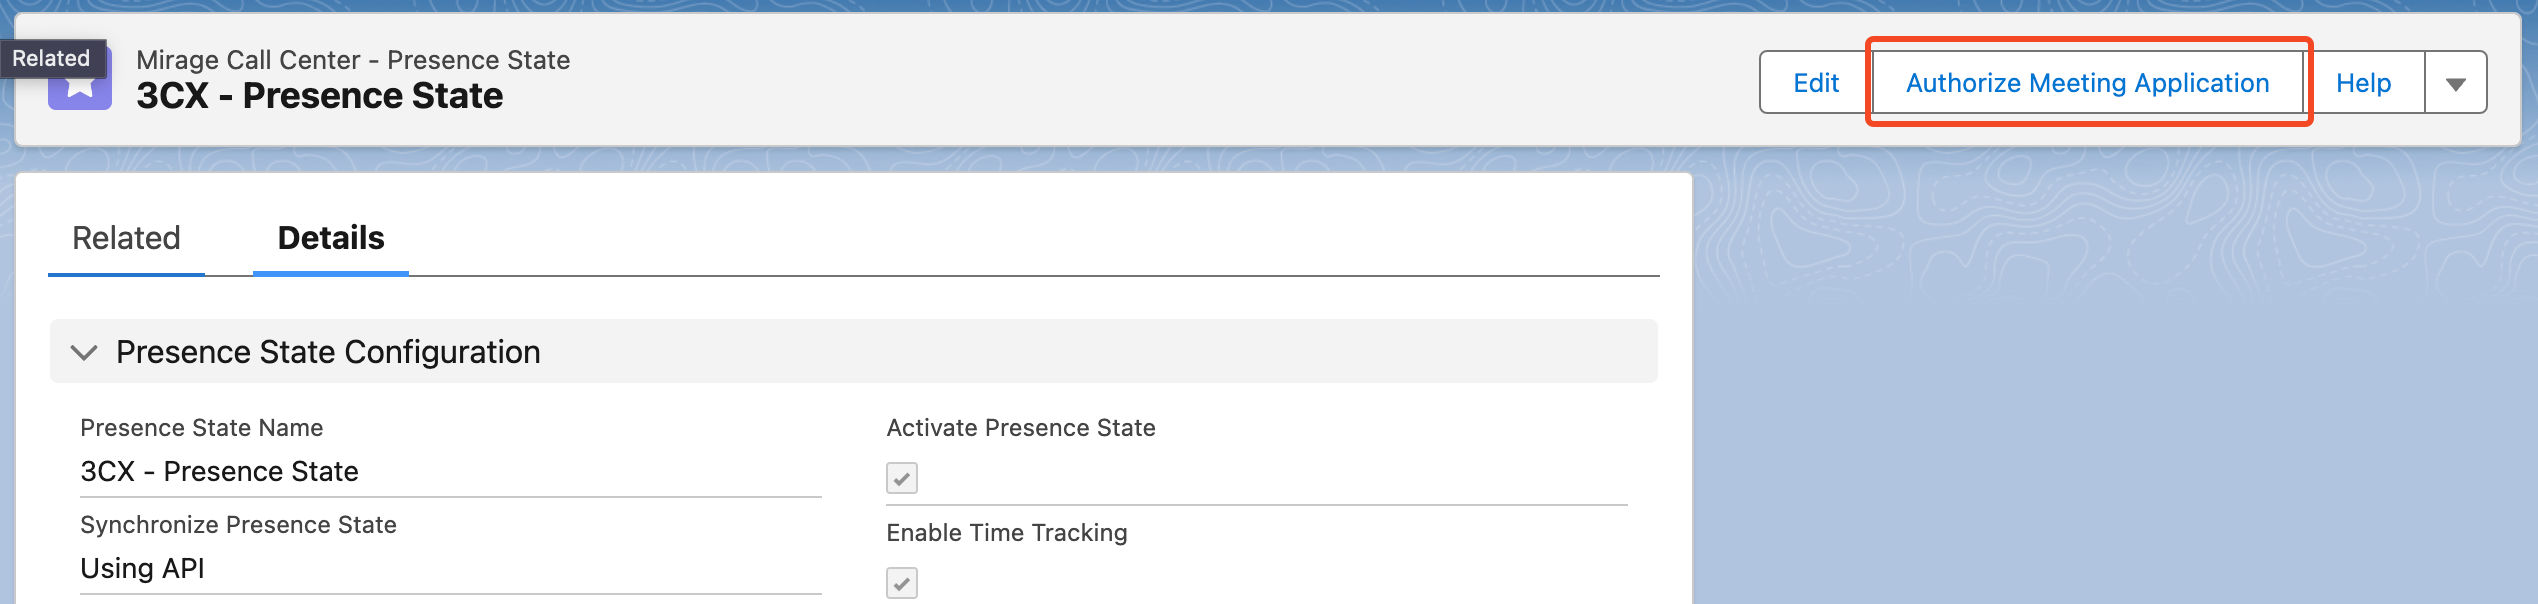
3. Authorizing the Meeting Application
After you've saved, scroll to the top and click on Authorize Meeting Application
A new page will appear, on which you need to enter the details of your Azure App which is used for the presence synchronization.
A guide how to configure the Azure App can be found here.
You also need to add the Redirect URI to your Azure App redirect URI-s.
Enter the App details and click on Save.
After the authorization, you need to logout and re-login to Salesforce.
Enter your Office 365 Email
You need to enter your Office 365 email address which determines the MS-Teams account you want to synchronize presence status with.
Click on the CTI Data Connector in the utility bar, then click on the gear icon, and click on the email tab, enter your email address and click Save.
|


